Hello Everyone,
The below blog content is on creating a general purpose managed instance for testing purpose ,using the azure portal and I will also be discussing a bit on using a few options to manage the instance .
Prerequisites :
1.You have basic understanding about SQL servers and its administration in general.
2.Awareness of basic azure networking/Security concepts like NSGs, Subnet, VNet etc.
(I will write a separate blog on Azure networking configuration sometime later)
It is recommended to have your Managed instance hosted in a seperate subnet for us to have control over the inbound and outbound traffic for the Managed instance.When we create one managed instance, one could see that there is a default NSG that gets created by itself ,mapped to the subnet we designate to host the Managed instance(s).
Lets get to the steps.
1. Search for the resource name "Managed instance " in the azure portal home page. See below for the screenshot

2.You should be able to find the Azure resource for the Managed instance like below.

3.Click on Create, , fill in the subscription, resource group, instance name and location.

There is also an option of creating the resource group in this window. You can go for that if you want. But I am assuming that you would also have a resource group created for grouping all the resources you would need for your POCs/Tests.
We have opted for East-Us2 as the location as the location looks to be the right fit for us because of three reasons. Its comparatively cheaper , has every resource we needed and is closer to our client location.You can choose a different location if you want based on your requirement.
I have suffixed the name of the instance with MIGP for denoting general purpose.
4.Scroll down for supplying more details .

Against Compute+storage field , you can provide the resource you need for the MI. You can also decide to go for General purpose or Business critical in the same place.
Click on configure managed instance and the below window will appear.


Azure team had left their short note for describing both the options, which I am attaching here for your reference.

I am leaving this to the Proxy method for now .We can change it to redirect later after adding a few inbound/outbound rules in the NSG associated with our managed instance subnet. (I will cover this in future blogs).


The below blog content is on creating a general purpose managed instance for testing purpose ,using the azure portal and I will also be discussing a bit on using a few options to manage the instance .
Prerequisites :
1.You have basic understanding about SQL servers and its administration in general.
2.Awareness of basic azure networking/Security concepts like NSGs, Subnet, VNet etc.
(I will write a separate blog on Azure networking configuration sometime later)
It is recommended to have your Managed instance hosted in a seperate subnet for us to have control over the inbound and outbound traffic for the Managed instance.When we create one managed instance, one could see that there is a default NSG that gets created by itself ,mapped to the subnet we designate to host the Managed instance(s).
Lets get to the steps.
1. Search for the resource name "Managed instance " in the azure portal home page. See below for the screenshot

2.You should be able to find the Azure resource for the Managed instance like below.

3.Click on Create, , fill in the subscription, resource group, instance name and location.
There is also an option of creating the resource group in this window. You can go for that if you want. But I am assuming that you would also have a resource group created for grouping all the resources you would need for your POCs/Tests.
We have opted for East-Us2 as the location as the location looks to be the right fit for us because of three reasons. Its comparatively cheaper , has every resource we needed and is closer to our client location.You can choose a different location if you want based on your requirement.
I have suffixed the name of the instance with MIGP for denoting general purpose.
4.Scroll down for supplying more details .

Against Compute+storage field , you can provide the resource you need for the MI. You can also decide to go for General purpose or Business critical in the same place.
Click on configure managed instance and the below window will appear.

As you see in the screenshot, on top you would get to choose business critical or general purpose.I have opted for general purpose for now and set the minimum VCpu and storage to keep the live DB file. We don't get to change the memory as it comes with the VCpu setting itself. (Memory for MI is 5 times that of the VCpu. For example : 4VCpu has 20 GB memory).
Upon choosing the desired configurations, click on Apply . (You can change these after creating the instance too. See below).

I have supplied the Admin credentials for creation here. This is the place you give your instance admin credential (Similar to SA account).
Click on next :Networking to continue .
5.Networking options
You can either create a new VNet or choose VNet/Subnet name from the list, which you may have created already.
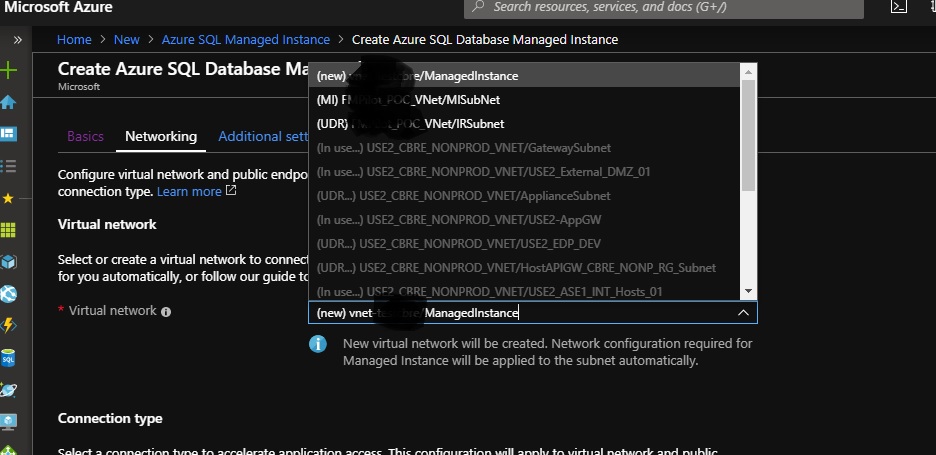
Below that there is a field named 'Connection type'
Two options we got here.


Below the connection type options, you can choose to enable or disable public end points. This is quite important to understand. Its recommended that you set up your Point- to-Site /Site to Site VPN setup ready for connecting to the instance over a private endpoint as the public endpoint is exposing your managed instance over the internet. You can disable after a later point too , when you have your VPN setup to connect from the On-premise SSMS.
6.Additional Settings.
Here as you see in the screenshot, you would get to choose the collation and the server time zone for your managed instance. You can check the collation you follow in your Production server and set it accordingly and for the timezone, I recommend to set it to the UTC time as i have set below as its the general best practice to follow.
At present, we are not configuring any DR option like Geo -replication.
You may turn it off for now.

7.Click on
Review+Create
This is where you get to review the settings we have applied til now.

I had to mask the named i have used as those are confidential to our client and project.
Once you click on Create ,your resource deployment to azure will begin and MI creation takes close to 6 hours.
You may check the portal again to see your Managed instance in 6 hours.

Basic Configurtions:
For getting the connection string details, there is a direct option named, Connection string in the left pane for the instance.
For public end point, you may copy the MI instance Url (Starting from tcp:MIservername,3342)., and connect to that from your SSMS supplying the admin credentials you have supplied.
1.Changing the backup retention of database
Azure Portal gives the option to do this along with the other options like powershell.
You can set the short term retention to any day between 7-35 in the database page in portal. Sample is given below.

2)Scaling the instance Up/Down
You can change the pricing tier (business critical to General purpose) or your compute resources in the left pane option called 'Pricing Tier'. You will see a window similar to the one we saw while setting up the instance.

Change what you need and click on 'Apply' to apply them.
I hope you find this blog post knowledgeable. Have a great day !
No comments:
Post a Comment